No sewing room would be complete without an amazing ironing station! This one is a must see and have for any quilter!
- I wanted the height to be 36". I'm 5'3" and find 36" to be just right for me!
- I wanted my ironing surface to be somewhere around 60" long x 20" wide. I would have preferred 22" wide, but was limited on space. I wanted a couple of inches on the back and sides open for fabric overflow.
- I wanted a shelf to set my iron on so I could lay out my entire quilt on the ironing surface! I find the Iron shelf to be extremely beneficial!
- I wanted storage underneath for all my stash!
- I wanted wall storage above for scissors, starch, water bottle, lint roller, thread catcher, etc.
- I wanted more shelving on top for all my cut pieces (i.e. 2 1/2" squares, 4" square, piano keys, etc.)

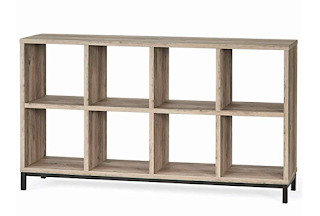
I bought the below Cube Storage Unit to use as a base. I happen to like this one because of it's width, height, length, price and just looks in general!
- 4' x 8' sheet of 1" thick plywood
- 2' x 4' stud (8' long)
- 4 to 6 screws 2" long with flat heads
- Spray Adhesive (optional)
- Heavy Duty Tinfoil (optional)
- Duct Tape
Insul-Bright Batting - enough to cover a 66" x 26" area - IMPORTANT for heat resistance!- Therma-Flec Heat Resistant Cloth Silver Fabric - enough to cover a 66" x 26" area- IMPORTANT for heat resistance and protecting shelving underneath
- Staple gun and Staples
- Shelf Liner (optional)
Instructions for Building the Ironing Station
- Cut the 4' x 8' sheet of plywood 60" x 20". This will be your top. I used a skill saw to cut it down to size.
- Cut the 2' x 4' stud in half so you have 2 4' pieces.
- Lay the 66" x 26" piece of Therma-Flec out flat on the ground with silver side facing down.
- Spray the Therma-Flec back with adhesive (optional) and lay the 66" x 26" piece of Insul-Bright on top of it.
- Spray the Insul-Bright with adhesive (optional) and lay the tinfoil on top of the Insul-Bright. Tinfoil was suggested by some people so that when you use steam the board doesn't warp. I don't know if it's necessary, but tinfoil is cheap so that's what I did as a precautionary measure!
- Lay the 60" x 20" plywood on top of the tinfoil leaving 3" on all sides.
- Roll all 3 layers (foil, Insul-Bright & Therma-Flec) onto the back of the plywood and staple. I used lots of staples!!! I always put a staple in the middle of 1 side and then the other side and then go down the sides and then do the ends with folding in corners last. I also duct taped over the staples.
- Screw the 2' x 4's to the back of the top leaving approx. 2 1/2" on each side.
- Cut shelf liner to fit on top of the 2' x 4's and then I used spray adhesive to secure to the 2' x 4's. This keeps the ironing board in place and keeps the top of the cabinet from getting scratched in case you ever want to use it for something else!!!
This completes your ironing station!!! You can always buy storage cubes to put in the storage unit. I just haven't got around to doing that yet!!! Actually, I'm a little on the cheap side and it will probably never happen. I just tacked cardboard on the back of the storage unit and called it a day!!! I was too cheap to buy a storage unit that had a backing (lol). Also excuse the cube mess - I'm not a very tidy person!!!
I'd love to see your finished products or hear your comments as to whether this tutorial was helpful or not!!! Happy Ironing!!!
If you haven't read how to make this Threadholder or DIY Design Wall these are always great additions to a sewing room!


I'd love to see your finished products or hear your comments as to whether this tutorial was helpful or not!!! Happy Ironing!!!
If you haven't read how to make this Threadholder or DIY Design Wall these are always great additions to a sewing room!


No comments